
Well after numerous people told me it could not be done, and everyone else told me to get a "monster tach" and bolt it to the dash, I finally got frustrated with it and sat down with a pen and paper to figure this stupid thing out. For those of you who care this is what I found:
The Jeep tach is controlled from a 12v pulse signal that is normally emmitted from the ECM when the #1 cylinder fires. This pulse is then transfered into a small circuit board which is attached to the stock tach. This circuit converts the pulse into a signal in which the tach's needle can read, and not show an erratic reading. The new small block or whatever you installed will give this signal from the distributor, coil pack, or msd tach output in my case.
On the circuit board there is a small Pot. (variable resistor) that is rated from ~3.0 ohms to ~ 10,000 ohms. This is an adjustment for calibration purposes that came in really handy when trying to figure this out. Basically for every 10,000 ohms taken away from the IC's ground (which is what the pot is doing) you lose around 2000 rpm on the tach's reading.
There is a small resistor attached in series with the pot. that is actually the nominal setting for the tach, and what i changed to make it work. That resistor is ~15,500 ohms on a meter. Well like i said for every 10,000 ohms dropped, you lose 2000 rpm, but remember you also have the ability from the pot to adjust 2000 rpm up or down.
I removed the small resistor and added one that is ~5600 ohms in its place, now dropping the lowest possible setting from ~2000 rpm to almost 0 rpm @ idle.
But remember, you can now adjust the rpm back up using the pot. So get yourself a portable tach, or dwell meter, and start comparing the needles. You can see in the pics i added a hole in the top of the gauge cluster to easily adjust the tach.
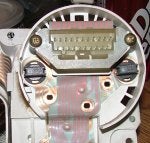
Start by removing the 3 screws that hold the gauge into the cluster.
![Image]()
Next, remove the 3 screws that hold the actual gauge needle to the circuit board. Note the 2 red areas, these are the spots that have to be unsoldered and re-worked.
![Image]()
This is the resistor installed with some pigtails added on because i used an old resistor i found in the box of about 10 million i have. Yes it is old as hell i know. Location R7 is where the small resistor was taken out.
![Image]()
This is the pot. that you will need to adjust later to make the reading correct.
![Image]()
This is a pic of the hole i drilled into the gauge cluster so that i can adjust it with the tach in place and the engine running.
![Image]()
Sorry for the long read, but to anyone who has gone through hell like i have to make this work, its worth it... :sonicjay:
This should be entered into some sort of jeep swap bible :tonka:
The Jeep tach is controlled from a 12v pulse signal that is normally emmitted from the ECM when the #1 cylinder fires. This pulse is then transfered into a small circuit board which is attached to the stock tach. This circuit converts the pulse into a signal in which the tach's needle can read, and not show an erratic reading. The new small block or whatever you installed will give this signal from the distributor, coil pack, or msd tach output in my case.
On the circuit board there is a small Pot. (variable resistor) that is rated from ~3.0 ohms to ~ 10,000 ohms. This is an adjustment for calibration purposes that came in really handy when trying to figure this out. Basically for every 10,000 ohms taken away from the IC's ground (which is what the pot is doing) you lose around 2000 rpm on the tach's reading.
There is a small resistor attached in series with the pot. that is actually the nominal setting for the tach, and what i changed to make it work. That resistor is ~15,500 ohms on a meter. Well like i said for every 10,000 ohms dropped, you lose 2000 rpm, but remember you also have the ability from the pot to adjust 2000 rpm up or down.
I removed the small resistor and added one that is ~5600 ohms in its place, now dropping the lowest possible setting from ~2000 rpm to almost 0 rpm @ idle.
But remember, you can now adjust the rpm back up using the pot. So get yourself a portable tach, or dwell meter, and start comparing the needles. You can see in the pics i added a hole in the top of the gauge cluster to easily adjust the tach.
Start by removing the 3 screws that hold the gauge into the cluster.
Next, remove the 3 screws that hold the actual gauge needle to the circuit board. Note the 2 red areas, these are the spots that have to be unsoldered and re-worked.
This is the resistor installed with some pigtails added on because i used an old resistor i found in the box of about 10 million i have. Yes it is old as hell i know. Location R7 is where the small resistor was taken out.
This is the pot. that you will need to adjust later to make the reading correct.
This is a pic of the hole i drilled into the gauge cluster so that i can adjust it with the tach in place and the engine running.
Sorry for the long read, but to anyone who has gone through hell like i have to make this work, its worth it... :sonicjay:
This should be entered into some sort of jeep swap bible :tonka: