Great Lakes 4x4. The largest offroad forum in the Midwest banner

Johnny's GoatBuilt JHF buggy build

1 reading
214K views 993 replies 64 participants last post by  JohnnyJ  
#1 · (Edited)
At post 110 I changed my mind and decided I would build a buggy instead of the Wag. The Wag continues to wait for it's next build.

At post 187 I ordered up a GoatBuilt JHF chassis to hopefully speed this up. (edit: nope)

Current Build plan:
GoatBuilt JHF Chassis, 108" wheelbase, "jeep" hood and grille
2007 Ford F250 Dana 60, 5.38, Sparty locker, JHF high-steer
- narrowed 4" to use 78 F250 axleshaft on the long side, using factory 1550 shafts
1998 Chevy K3500 14-bolt, shaved, 5.38, Detroit, 1/2t chevy disc brakes
39" BFG Krawler Red labels on KMC Machete Beadlocks
2001 GMC Yukon XL 6.0L LQ4
  • Holley TerminatorX EFI
  • Champ oil pan (high-ish clearance, baffled, steel)
  • Dorman LS2 car intake and Warr cable throttle body
  • Holley fuel rails with late-model 6.0 truck injectors (EV6, E85 flow rates, 12613412)
  • Goatbuilt accessory brackets, TC pump on driver's side, alt on passenger
  • GM 706 heads
  • BTR Truck Norris cam
TH400 built by Tranny Tom, Reverse Manual with Winters/WOD shifter
Atlas transfer case, 3.0 low range
Fox 2.5 air shocks
PSC Full Hydro, 2.5x10" ram, TC-pump
Mastercraft cheap seats with Impact 5-point harnesses
Griffin 31x19 radiator, Derale 16927 shroud and twin fans
Goatbuilt fuel tank and factory fuel pump
Magnaflow muffler mpe-12649

Image


==================

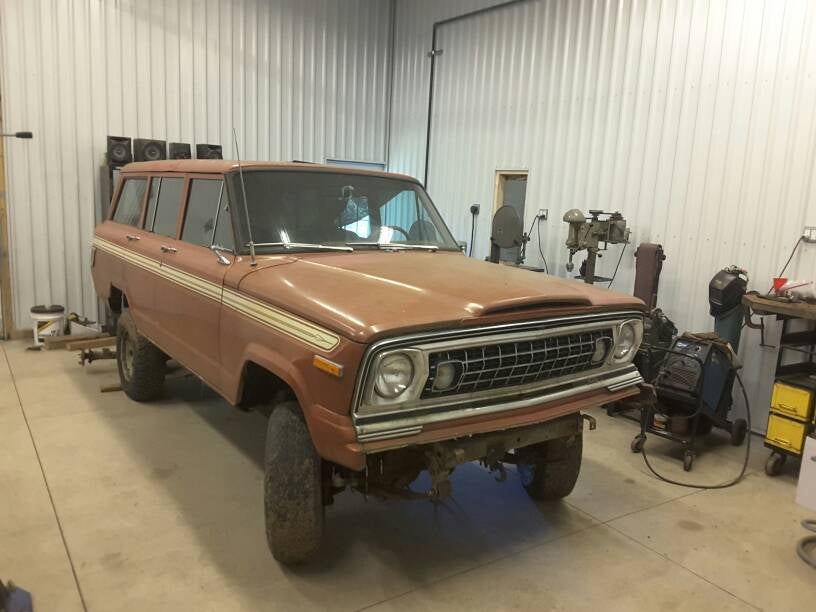
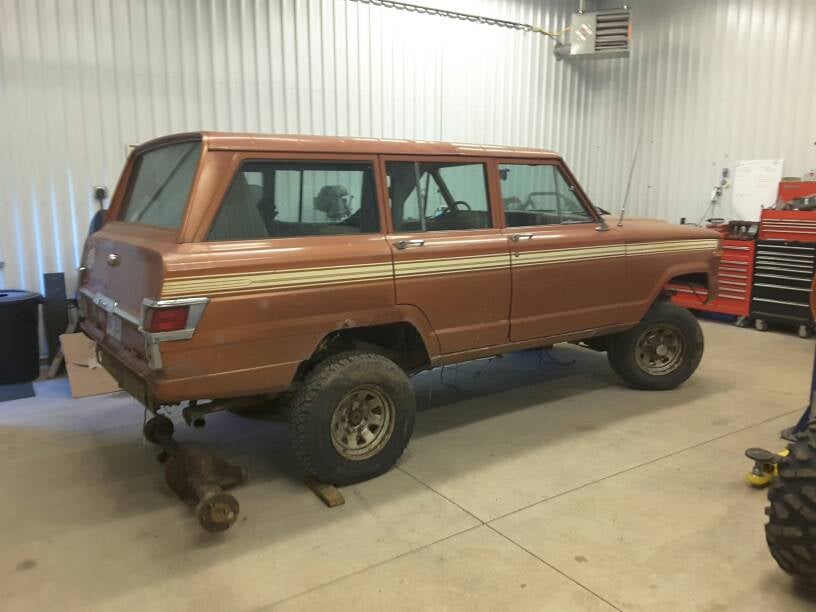
I bought my Wagoneer in 1997. It was my first 4x4 and I bought it so that me and my friends could go camping and have room for our gear since we all drove econoboxes. That fall I ended up moving to Germany for 18 months and it went into storage.

When I got back I rebuilt the AMC 360 with the help of a friend, and we did enough maintenance on the rest to get it on the road. Over the next few years it got a 4" lift and went from 31s and then 35s when I put a 3" body lift. We did some wheeling with it and eventually I put it on 33 Stampers from my old Wrangler.

In around 2005 it was parked due to lack of time and using any spare time on my Wrangler. A few years later we stole the drive train for the TREC Wagoneer, and it has sat since.

Over the summer I got out of racing, bought a RZR and drug this back in the shop. I'm thinking I want to get it back on the road and trails.

Image


Image


Sent from my SM-T710 using Tapatalk
 
#709 ·
There are two fill line dimensions, min and max. Any reading you do, you will always find that more is better than less. It's way easier to pour oil in and measure with a scale than fuck around with measuring into a cup and then pouring a second time. (are you actually low on oil due to the film of oil still on the cup? hmmmmmmm)
 
#711 ·
Info on my shocks:
9T3XJ
·Premium Member
Joined Feb 12, 2006
·
218 Posts
#63 · Dec 22, 2015

Currently single bleeds front and rear but I'm going to open the second bleed hole in the rears back up.

I've always run stock oil levels but I have played with valving. Valving alone makes a big difference in the 2.5's.

If my memory is right my fronts are valved 90/40, and rears are 70/40 but I think I'm gonna try 70/30 in the rear when I open up the shocks again.
 
#712 ·
Fitting the fuel pump. Over on irate, Hydrodynamic posted he had modified the fuel pump plate for a Goatbuilt tank to use a 2005 Silverado pump and posted the CAD file.

I wanted to use that pump since it is returnless from factory and makes plumbing easier. I asked Broncar to cut it out of some 1/8 stainless I had. It took some cleanup but it fits great. I have a harness pig tail to connect the wiring.

I need to install some nutserts and install o-rings and gaskets and it will be good to go.

279692
 
#716 ·
Steering is plumbed enough I could run it. I have some old lines running from the valve to the ram in place for now. Waiting on 2 90* fittings for the ram that will allow use of straight hose fittings to the ram. Once in, I'll have some new crimped lines made and I will also will take the field serviceable line from pump to valve in and have a crimped version made. Then I will have some spares for the box.

Waiting on trans cooler fittings, but hoping that is small-ish job. I need to go to inline tube and get a 10' section of 3/8 fuel line to run from tank to fuel rail. And final plumbing for running engine is cleaning up routing of radiator lines and trimming to fit. Oh.. and all brakes. yikes. I've been more focused on engine running than buggy stopping, so I keep making brakes lower priority.

Serpentine belt take 3 and 4 will be in this morning. Hoping there's no take 5..

Ran 4 gauge GXL wire from alternator to the battery. I picked up a hydraulic crimper from harbor freight and it makes a nice crimp, hoping for no issues. I need to route the starter to battery wire and make chassis and engine grounds and the big cable will be done besides winch wiring. I have thought of throwing the winch on just to have all big cables routed.

I need to make a tray for center stack where I hope to mount ECM, relays, and fuse panel. I picked up aluminum sheet last week so I have material for that.
 
#719 ·
Will definitely post up some pics. I have an idea, but not sure if it will end up dipping too close to exhaust. Like so many things, I feel like there's plenty of room, then I start making something and somehow it gets smaller.

It looks like Ann Arbor Driveshaft is gone. I've bought a handful of driveshafts from there, and he was always reasonably priced and had good turnaround time. He also was willing to make 3/16 or 1/4 wall driveshafts, so that was good. So I tried to order one from a shop and they called me back a few hours later saying they went to set my stuff aside and they are out of stock on slip yokes, and not sure when they are off back order. Ugh.

So plan C.. just ordered front and rear kits form Wide Open Design. They claim they are in stock, so other than spending some time cutting and welding them up, hopefully that means that keeps moving along.
 
#722 ·
Like so many things, I feel like there's plenty of room, then I start making something and somehow it gets smaller.

So plan C.. just ordered front and rear kits form Wide Open Design. They claim they are in stock, so other than spending some time cutting and welding them up, hopefully that means that keeps moving along.
I feel the same way...thought I'd have all kinds of room for things, my chassis isnt exactly small. But now I feel like I'm playing Tetris with things. I'm sure when (if) I build another chassis it'll be better as I've learned a lot from this build.

I've got their driveshaft kits but haven't put them together yet. Everyone seems to be selling the same stuff online so it came down to pricing and avaliblity.
 
#729 ·
Still have a few loose ends with wiring, but I got the majority of essentials done today. Was able to try out headlights and powered up the Holley.

I need to finish radiator plumbing, make a fuel line, run a vacuum line to the computer, fill fluids and probably 10 other things I’m forgetting and it willbe ready to fire up.

279782
 
#730 · (Edited)
my to do list, need to put this up in the shop.

Safety:
Make/install seat belt tabs
Bolt in harnesses

Chassis:
Fuel line from tank to engine
Mount gas pedal
Make panel between seats including center console
Double shear upper link brackets
Pillow block mount
Mount engine skid
mount for electrical shut off
Trunk panel / tail light mounts
Rear triangulation bars
Install Winch including finish weld winch mount
Exhaust hanger
Nut & Bolt

Cooling:
Finish radiator lines
plumb steam port
install heater bypass hose
check all clamps are tight
fill (distilled water and water wetter)

Brakes:
Install brake pedal
install brake shut off valves
install brake light switch
plumb

Shocks:
install Schrader
refill shock
add N2

Rear axle:
install r&p
install calipers / mounts
install yoke protector

Driveline:
mount shifter in center console
fill trans and transfer case
build driveshafts

Engine:
Setup Holley for injectors
Run vacuum from intake to computer

Steering:
Replace fittings at ram
fill / bleed

Wiring:
Install grounds for radiator fans and fuel pump
Power feed through shut off switch
Brake light switch
Taillights
Remote winch controls at winch
Horn button
Make USB switchable
 
#734 ·
Safety:
Make/install seat belt tabs

Cooling:
Finish radiator lines
plumb steam port
install heater bypass hose
check all clamps are tight
fill (distilled water and water wetter)

Shocks:
install Schrader

Rear axle:
install r&p (done-ish, need to swap carrier)
install calipers / mounts

Engine:
Setup Holley for injectors
Run vacuum from intake to computer

Steering:
Replace fittings at ram
fill / bleed
knocked this off the list. Need some hardware for seatbelts to install. Working on fuel line so I can start & run engine. Need an inline fill in top radiator hose to aid in bleeding radiator.

Last night I spun the engine over with the starter. So with fuel I hope it lights off.

The rear ring gear is installed on the original gov-lock carrier. Two attempts on reusing open carrier for Detroit, so I just bought one from DTS. When Mike gets a chance, he'll come and finish up. Should be a "quick" job as we just need to move the ring gear over and reset backlash.
 
#735 ·
It runs!!!!!

The plug I bought for the fuel pump had the right color wires, but in wrong position. I didn’t catch that when I wired it. Rewired and it fired right up. Next issue was it threw the belt when we gave it the beans. We threw a few washers behind the tensioner and that seemed to fix it. I’ll make a spacer to make it permanent.

Next up is adding a remote fill in the upper radiator hose to get it to bleed.

Thanks White Rhino for the help getting it fired up and troubleshooting the startup issues.